DigitalOcean provides scalable virtual private servers (called droplets), provisioned with SSD storage, in multiple locations, and provides DNS hosting.
The LXC or Linux Containers may be defined as a way to isolate the tree process, the full user system, and the network configuration in a separate disk space (filesystem) into the same host thanks to the Linux kenel function to provide separate namespaces and control groups (cgroups) to access resources.
In the container operating environment the system is showed as a complete installation of a linux distribution with its root user, system users, and normal users; its processes, crontab and services, its own installed software, its IP address and network configuration. Perhaps, for these reasons it has been misunderstood many times as a guest system running into a virtualized environment, but it is not.
The droplet (host) is a virtualized environment (KVM based) which only runs one kernel that manages all the processes, memory, network, blocks, etc. For this reason it is possible to create containers in it, because containers are only isolation.
Moreover, droplets also come with just one public IP address, because of this a basic virtual network configuration is requried to access from outside to a service listen at the virtual IP of a container.
To know more about LXC I suggest two documents:
- Getting Started with LXC on an Ubuntu 13.04 VPS
- How To Install and Use Docker: Getting Started, as docker is an application (daemon) level container.
Installation
apt-get install -y lxc libvirt-bin
Mount the cgroup
The control groups are a Linux kernel feature to limit, account and isolate the resources (i.e. CPU, memory, disk I/O, etc.)
It is required to add the following line at the end of the /etc/fstab file:
cgroup /sys/fs/cgroup cgroup defaults 0 0
and then mount it with the command mount /sys/fs/cgroup.
live-debconfig into containers
(perhaps this step will be obsolete) The package live-debconfig will be required to containers but it is not available into Debian Wheezy, therefore it is require to download from unstable version. You must make available live-debconfig package following these commands:
echo "deb http://ftp.de.debian.org/debian unstable main contrib non-free" > /etc/apt/sources.list.d/live-debconfig.list
apt-get update
cd /usr/share/lxc/packages
apt-get download live-debconfig
rm /etc/apt/sources.list.d/live-debconfig.list
apt-get update
Networking
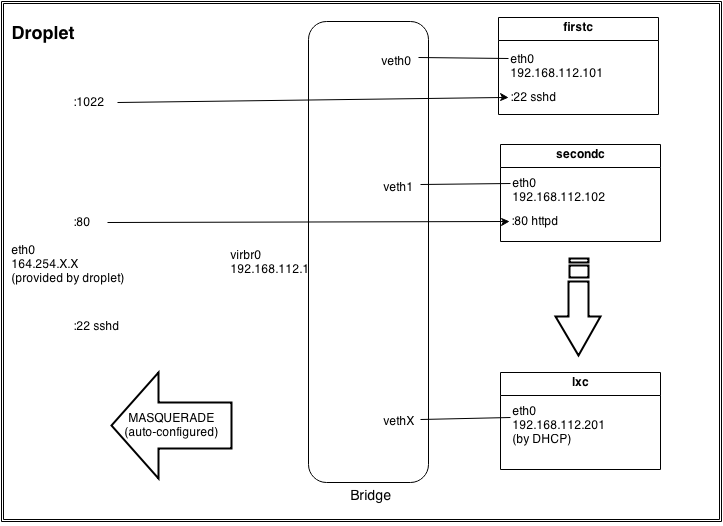
It is important full understanding of the network where the containers system will be connected, because you will need to forward ports and masquerade IPs and if you implement a full firewall configuration you will deal with inter-container communication rules.
The following schema is the configuration that implements this document:
Mark default Network to autostart:
virsh net-autostart default
and start it:
virsh net-start default
Check installation
Run these commands to check the output:
The cgroup filesystem with mount
sysfs on /sys type sysfs (rw,nosuid,nodev,noexec,relatime)
proc on /proc type proc (rw,nosuid,nodev,noexec,relatime)
udev on /dev type devtmpfs (rw,relatime,size=10240k,nr_inodes=126890,mode=755)
devpts on /dev/pts type devpts (rw,nosuid,noexec,relatime,gid=5,mode=620,ptmxmode=000)
tmpfs on /run type tmpfs (rw,nosuid,noexec,relatime,size=102708k,mode=755)
/dev/disk/by-label/DOROOT on / type ext4 (rw,relatime,errors=remount-ro,user_xattr,barrier=1,data=ordered)
tmpfs on /run/lock type tmpfs (rw,nosuid,nodev,noexec,relatime,size=5120k)
cgroup on /sys/fs/cgroup type cgroup (rw,relatime,perf_event,blkio,net_cls,freezer,devices,cpuacct,cpu,cpuset,clone_children)
The network configuration with virsh net-info default
Name            default
UUID            f1fed759-c42b-a727-6513-1bcea1a03436
Active:         yes
Persistent:     yes
Autostart:      yes
Bridge:         virbr0
and with ip addr show virbr0
4: virbr0: <BROADCAST,MULTICAST,UP,LOWER_UP> mtu 1500 qdisc noqueue state UP
    link/ether fe:cf:e2:f5:51:2a brd ff:ff:ff:ff:ff:ff
    inet 192.168.122.1/24 brd 192.168.122.255 scope global virbr0
The LXC configuration with lxc-checkconfig
Kernel config /proc/config.gz not found, looking in other places...
Found kernel config file /boot/config-3.2.0-4-amd64
--- Namespaces ---
Namespaces: enabled
Utsname namespace: enabled
Ipc namespace: enabled
Pid namespace: enabled
User namespace: enabled
Network namespace: enabled
Multiple /dev/pts instances: enabled

--- Control groups ---
Cgroup: enabled
Cgroup clone_children flag: enabled
Cgroup device: enabled
Cgroup sched: enabled
Cgroup cpu account: enabled
Cgroup memory controller: enabled
Cgroup cpuset: enabled

--- Misc ---
Veth pair device: enabled
Macvlan: enabled
Vlan: enabled
File capabilities: enabled

Note : Before booting a new kernel, you can check its configuration
usage : CONFIG=/path/to/config /usr/bin/lxc-checkconfig
First container
It is time to deal with containers:
Create
It is possible to create the container with any name -n: for this document firstc is the name. Also the template -t for this document is debian but you also have available fedora
lxc-create -n firstc -t debian
For the first container you will need to wait because all packages are being downloaded. From there on all packages will be copied from the local disk.
Network the container
The installed container does not have any network configuration, you must add it add the end of the file /var/lib/lxc/nombrecontainer/config
## Network
lxc.network.type = veth
lxc.network.flags = up

# Network host side
lxc.network.link = virbr0

# MUST BE UNIQUE FOR EACH CONTAINER
lxc.network.veth.pair = veth0
lxc.network.hwaddr = 00:FF:AA:00:00:01

# Network container side
lxc.network.name = eth0
lxc.network.ipv4 = 0.0.0.0/24
Start container
lxc-start -n firstc -d
and check if it is running with lxc-list with output:
RUNNING
  firstc

FROZEN

STOPPED
Attach to console
Now you may login the container system with a standard console and user root with the password root
lxc-console -n firstc
Remember Type Ctrl+a q to exit the console
and also install and configure what you wish into the container as any recent installed system, because the container may access Internet by masquerade with the droplet IP.
Stop and manage your container
Now you may manage your container:
- lxc-stop -n firstc to stop the container
- lxc-destroy -n firstc to complete delete container installation
or configure it to autostart when you restart the droplet with:
ln -s /var/lib/lxc/firstc/config /etc/lxc/auto/firstc.conf
Access services into Container
You must configure a static IP to the container, for it to fullfil iptables access rules. There are two ways to do it:
- With static IP address saved into the config file /var/lib/lxc/firstc/config adding
lxc.network.ipv4 = 192.168.122.101/24
line. This is equivalent to a static address configuration.
- A static IP address assigned by the DHCP matching the MAC address of the container. Virsh provides a basic dhcpd through dnsmasq.
Configure static IP with DHCP
In /var/lib/libvirt/network/default.xml configure a static IP address to match with the container’s MAC address:
  <dhcp>
    <range start="192.168.122.201" end="192.168.122.254" />
    <host mac="00:FF:AA:00:00:01" name="firstc.example.com" ip="192.168.122.101" />
    <host mac="00:FF:AA:00:00:02" name="secondc.example.com" ip="192.168.122.102" />
  </dhcp>
after these, it is required for you to re-start the complete network, the commands are:
virsh net-destroy default

virsh net-start default
but if you are running containers they will lost their network and will be required to be restarted.
Port forwarding
All services are being accessed by just one IP address, thus the same service from a different container requires a different public port
ssh into each container (firstc)
iptables -t nat -A PREROUTING -p tcp --dport 1022 -j DNAT --to 192.168.122.101:22
in this case it is required to move the standard sshd port because the droplet has its sshd on 22 by default.
http into just one container (secondc)
iptables -t nat -A PREROUTING -p tcp --dport 80 -j DNAT --to 192.168.122.102
In this case if no other container or doplet has a webserver, you may use the standard httpd port.
Conclusion
Containers are fun and are supported by the droplets, so play with them.


Pingback: Bitacoras.com